28 February 2010

A Night Out on the Town

This post is dedicated to Perry from whom I borrowed the inspiration.


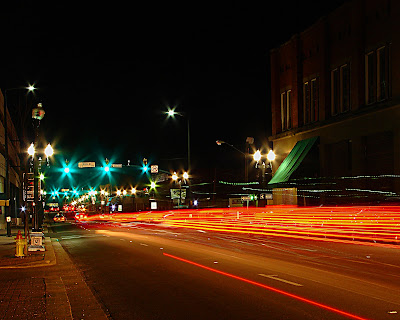
After receiving a kitchen pass last night, I decided to go down town to the Boardwalk in Bossier City and into downtown Shreveport. At our workshop last week Perry was talking about how he wanted to get some nighttime city shots from I-20. I wasn't going to brave the perils of the interstate so I took the safety of the Boardwalk. It's normally a 15-30 min drive to get there but Saturday night traffic was terrible. I guess there were a lot of other kitchen passes as well. Anyway, I was able to get some pretty cool shots from the water's edge (or at least as close as we're allowed to get) and then moved up to the Texas Street Bridge for a birds eye view. Finally I moved over to Shreveport and got some cool "streaming" shots.

I learned several things during my trek. 1) This city (cities) is beautiful at night. 2) I figured out how best to use my settings and especially how to use my manual setting (I have to first go to Aperture priority and set that, then to Shutter and set that. Manual will then use those two settings). 3) Bridges move, A LOT, and getting a "tack sharp" photo on them is not easy. 4)I need to get a remote for my shutter because trying to time traffic 12 seconds out is not fun (10 sec for the timer and 2 for the shot itself). And 5) How to sharpen and contrast cityscapes in Photoshop.


27 February 2010

Updated - Winter In the City

This is an update to the earlier post, Winter In the City.  In it I discussed my disappointment in my ability to take any decent photos of downtown Shreveport while I was walking around.  Well I went back and decided to experiment with them.  There's a process called High Dynamic Range Imagery (HDR) where by you take 3 or more photos at different ISOs, one normal, one or two at a stops lower and one or two at stops higher.  Then you take fancy software and it will tone map and merge the photos into one picture where the shadows are very dark and the highlights are very light and all the colors are very vibrant.  Take a moment and Google Images HDR to get an idea of what it's supposed to look like.
Well, since I have neither the camera nor the fancy photo software (yet, see previous post) I had to fake it.  What I did was take the one photo I had and I manipulated the color to give it a faux HDR look.  First, using Photoshop Elements 6,  I went to Enhance>Unsharp Mask...  From there I increased the Amount % and Radius up or down until I got something I liked.  I didn't touch the Threshold.  I then either raised or lowerd the Contrast and Saturation so I got the color I wanted.  Again, this is not the "correct" way to do this but it will work in a pinch.  Take a look below and see how they came out.

P.S. In The Salvation Army photo I had to Shop out some power lines running through it.  That was a bit of a challenge!


Make It Worth It

So I made my first foray into the world of Stock photography. Stock photography, for those who don't know, is a large database of photos, art, and graphics. Instead of a site hiring their own photographer to go out and take photos for them, they just buy them from one of these sites. It's been something I've been toying with for a couple of weeks now. I co-worker who is business inclined suggested it to me. My goal is to one day be able to sell my photos but I had always envisioned printing them all out in various sizes and different frames and sitting on a street corner or at a craft fair and hocking my wares. I hadn't really thought about posting and selling until recently and since this whole "world wide web" experiment seems to be taking off, I'm jumping on the bandwagon.

I'm going to take it slow and only add one company at a time. I'm joining only non-exclusive sites meaning that I am free to sell through other companies. Multiple (theoretical) income streams! The first site I went with was Crestock.com. They're not the biggest or the best but it was pretty easy to get involved. Just create an account (make sure you read the Consent for any site before you agree, it's your property you're loaning after all) and start uploading photos. They only pay a 20% commission! (30% after you sell 100 photos) which is pretty awful, but since they aren't one of the big hitters yet it's easier for someone new like me to get my feet wet and learn the ropes. I'm also hoping that they'll have a less stringent Quality Control (QC) process and more of my photos will get through. Still, making 20% on selling one photo for $1 is more than the 20% of $0 I'm making now. I'm not hoping to get rich (yet) but just want to see what is possible. Now I just have to go through the rigorous process of naming and key wording all of my photos I've uploaded thus far. fun...
My only goal at this time is to make enough money from selling that I could support my habit; adding to and upgrade my gear. I've already gotten spousal approval for upgrades but that budget is pretty much set and I've found more things that will help me get better. So I feel that if I can make a couple hundred bucks a year from various sites I can funnel that into better products, not have to take from the family funds, and get what I need to take this to the next level.

25 February 2010

Winter in the City

I got out of work early today (in training the last few) and decided to head down town to see what I could capture. It was my first dedicated endeavor like this and I had everything I needed in my handy little back pack I got from Elizabeth. Long story short (too late) I didn't get "the shot". I wouldn't even say I got anything too interesting. I don't know whether it was lighting, as it was an over cast day, or I'm just not a cityscape guy, but I was mildly disappointed by what I got. I may post some pics here when I clean them a little but don't get your hopes up.
One thing today's walkabout did produce was I got to know this city a little better. I went first to the roof of the Sam's Town parking garage and got some city shots then on to Texas Street for some building shots and stopped by the library for some photos for the Mrs. I then drove east to the Music museum. I was a little confused when getting out of my car I saw engraved in the building "Dedicated to the memory of those who fought in the World War". I couldn't figure out which war that were talking about until I realized at the time the building was built there was only one World War. Cool! There was a quote by Woodrow Wilson! on the side as well. Next I took a walk across the street to the old city grave yard and saw graves of C.S.A. solders and infants. There was one section of graves from East European Jewish immigrants from the 1800s. There were other graves all over of people from Germany, Prussia, France, Switzerland. I never new Shreveport had so much immigration back in the 1850s. It was very cool.

I plan on suggesting to Perry (our workshop instructor) we do a class downtown and maybe I can get some inspiration from my fellow shooters.

UPDATED

My Winnings at the Casino

I drive down A.R Teague Parkway on my way home from work everyday. It's a very nice drive along the Red River and the scenery has a very nice glow about it. I stopped in the Diamond Jack's parking lot to see if there was anything that caught my eye near the river. Nothing exciting but I did like the flag and the sun combo:


I set the ISO at f/8 and shutter speed at 1/1000 (both the highest my camera will go) in order to let as little light in as possible. It was still brighter than I would have liked but it worked. In Photoshop Elements I also upped the saturation levels quite a bit (near 50 if I recall) and adjusted the contrast so that the shadows were darker. I gave it kind of an "early era of color" look for artistic purposes.


On a separate note, I created a copyright, as seen in the photo above. I'm not worried about people stealing my photos (at this point I'd be honored to have them show up somewhere) and legally a copyright in not required (you own the photo the moment you snap it, FYI) but it makes me feel and my photos look more professional. We'll see if it changes down the road but now I have the task of going back and adding it to all of my "good" shots.

Photography Workshop - Flowers on Black Background

Well there's a compelling title! Anyway, yes, I am attending a photography workshop at my church every other Sunday. It's pretty basic (which is what I need) but it gives me a chance to learn and try new things. This week it was flowers. We had a short discussion on how-to's for shooting flowers using Scott Kelby's book, The Digital Photography Book #1, as source material. Then on to the application!

We shot using a black back drop held up on a rigging and draped over a table about three feet out. Light was supplied by 2 umbrella lamps (I have no idea what the technical term for them is but I'm going with umbrella lamps. The kind you see in Sears for kids photos). We moved the vases and flowers and turned off lamps as necessary. Here's what I got:

"Posed" shots aren't my favorite, I prefer naturally occurring. That being said, this is really my first attempt at posed flowers and it wasn't so bad. It took me a few moments to find my comfort zone but once I knew what I was looking for, I went with it. I still don't like the fact that I can't get my camera to "stretch" the photo like I want (another term I just came up with, stretch 1. to make the foreground and background look further apart by blurring one or the other. Sounds good eh?). I keep seeing too much detail in the background covering. I need to upgrade my camera to get what I want. Hopefully more on that in a later post!
One of the tips in the book was to take flower photos right after the rain. We so happened to have some of that earlier and I took advantage:
I'm sure I looked amusing to any passersby as I was laying on the wet ground, getting covered with mud and sticking my camera right up to flowers (again, would be solved by an upgrade). Ah, the sacrifices I make for my craft! I think they came out pretty well though.

The First One

So, this is that "web-logging" thing that's all the rage with kids these days. My wonderful wife has been blogging for sometime now and does enjoy it so. She's built quite a following discussing the things she loves; our kids, mothering, gardening, cooking/baking, and being "crunchy" in a Conservative way.

It's come to my attention recently that I'm artsy. That disturbs me to the core. Artsy people dress weird, talk weird, and are usually annoying to anyone who isn't artsy like them, e.i. me. But I took stock of my passions the other day. I love to cook, garden, play music (drums), I can tell the difference between salmon and pink (I'm so ashamed), I enjoy a good musical (preferably with hookers and rock music) and I love to take photos. That sounds pretty artsy to me. So this is my blog about the things I love, mainly photography with the others thrown in when I get an inclining.

The title is a reference to (besides Friends of course) the fact that every time I've created a blog, or online journal as I once referred to it, they don't usually go far beyond "the first one". I'm hoping this will be different, will have a purpose. I've been told that I take a good photo. I make my best attempt at it (hence the name) and see what comes out. I don't have much more training beyond a book I read and a 5 min crash course from a real photographer. That being said people have started asking ME for tips. Weird.

So that's my thought. I'll use this blog to chronicle my adventures in imagery, pass along any words of "wisdom" I am able to squeeze out of this tiny brain, and try and avoid annoying all my friends on Facebook with constant publishing of my latest photography attempt. I'll just annoy you!